Camera Test 2: Exposure Setting
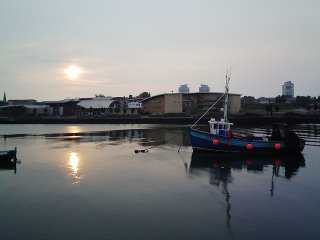
Look at the difference between the two shots below and I'll tell you how the top one turns out to be a cleaner and clearer shot. There was no Photoshop wizardry involved, it relies only on adjusting one of the 770SH's very easy to use settings.
Both pictures were taken last week at about six in the evening. The location is the River Wear, opposite St Peters Campus, part of Sunderland University where I study.
 Tip: Click on the pictures to enlarge them and you'll see the difference more clearly.
 The bottom photo, the darker one, was taken with the exposure level set to normal (zero) whereas the top one, I increased it to the maximum (+2). To do this is easy, Menu> Camera> Options> Exposure, then use the up/down keys.
You might want to use this because there'll be times when your pictures look too dark. Why? The 770SH doesn't have a flash but as you can see changing the exposure level can to some extent overcome this. (Ok, my disclaimer: if you want to take pictures in the dark then no amount of fiddling with the settings is going to help!)
As with Camera Test 1, I set the 770SH's settings to their maximum in order to get the best photograph possible; that's 960 x 1280 dots, picture quality set to 'super fine' which created, in this case, a jpeg of 335 kb.
The real testament to the Sharp 770SH is that despite the user's lack of artistic vision, technical skills or digi know-how, the 1.3 mega pixel camera takes a pretty decent picture.
Next up in the camera testing series is Camera Test 3: Still Life (Indoors)


2 Comments:
Hi! Good previews, but the I can't open the larger images...
Waiting for those indoor pics! ;) Thanks
Hmm, you're right. What's going on with the main images? Let's hope the indoor images work!
Post a Comment
<< Home